
How to change your Windows key into the macOS Command key
January 23, 2022I'd like to be very clear about the intentions of this guide. There are many articles that mention the Windows key and the Command key and almost all of them are for Windows users forced to use Mac, but what about the inverse? Never in years of intermittent searching have I found a guide that outlines what I want to do:
I want to change the Windows key into the Command key.
I use my MacBook Pro all day in my role at Splunk to develop software, so the transition after work to playing games and coding on my PC is jarring. Not only due to the physical placement of the two keys, but also due to the differences in the operating systems. Wouldn't it be great if I didn't have to think about what system I was using to accomplish common tasks and hit my hotkeys "naturally"?
Let's take one of the most fundamental functions: Copy and Paste. On the Mac, you have CMD + C, for copy and CMD + V for paste. In Windows, you have Crtl + C and Crtl + V. That's a simple re-mapping of the Alt key to become the Crtl key.
Are we done? Not quite, let's add another important feature both systems share: Tabbing between applications. On Mac, we're accustomed to using CMD + Tab and CMD + Shift + Tab to quickly navigate between our open programs. The identical feature on Windows is summoned with the classic combination: Alt + Tab.
Do you see the problem yet? Our Crtl key needs to perform double duty. In order to mimic the Command key, it has to function like Crtl for copy and paste, but Alt for switching applications.
This is slightly complicated by the fact we need to preserve Crtl in it's current location. On the Mac, the Crtl + Tab key controls tabbing between things within an application, like in Chrome or VSCode. We intend to use Crtl + Tab and Crtl + Shift + Tab without any alterations.
What we need is an entirely different key. Enter the Windows Key.
Mechanical Solutions
But first, let's talk keyboards. Mechanical keyboards are more popular than ever. They're highly customizable, including their layouts. Could we achieve what we want by creating a layout in QMK Configurator? Sadly, it doesn't quite meet the requirements. While it's common to create custom layers and it's techincally possible to code macros into your firmware, the complexity is daunting and the functionality is limited.
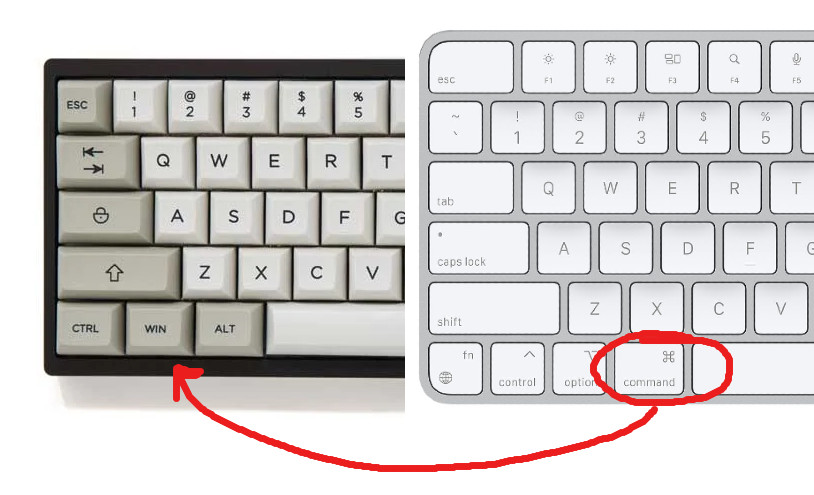
The one layout change I have commonly implemented is moving what's called the "OS Key", or sometimes the "Super" key, one position to the right, closer to the spacebar. This change makes the average keyboard's layout more closely match the MacBook Pro's. The order from left to right is "Crtl", "Option", "Command" ("Crtl", "Alt", "Win"):
The result of this simple change is that when my keyboard plugs into a Mac, the key works as the Command key like I'd expect, in the standard position. When I plug my keyboard into a Windows machine the key is the Win key, in a position that matches the Mac. Now, we just need to make the Win match Command's functionality as well.
AutoHotkey
AutoHotkey is a scripting utility with deep features and great documentation. I had previously experimented with "key re-mappers" like KeyTweak and SharpKeys, but found them wildly lacking and painful to use. AutoHotkey goes much further than simply re-binding keys by virtue of it being a full scripting language. AutoHotkey features variables, control flow, and automation. It's also backed by built-in docs and a community with interesting history. If only I'd discovered it back in the early 2010s!
First Script
The quick start tutorial is easy enough to follow, so I suggest that you follow the basics to get your first script running. A shortened version is reproduced here:
- Go to the AutoHotkey Homepage: https://www.autohotkey.com and Click Download.
- Once installed, right-click on your desktop, select "New" -> "AutoHotkey Script"
- Edit the file, pasting in your "Hello World" script below, save it. Double click to run it. It runs in the taskbar.
^j::
Send, My First Script
return
- Finally, to test it, open a text editor, and press
Crtl + jand you should see the text.
To explain: ^j is the hotkey combo of Crtl and j, and Send being the command. The :: seperates them.
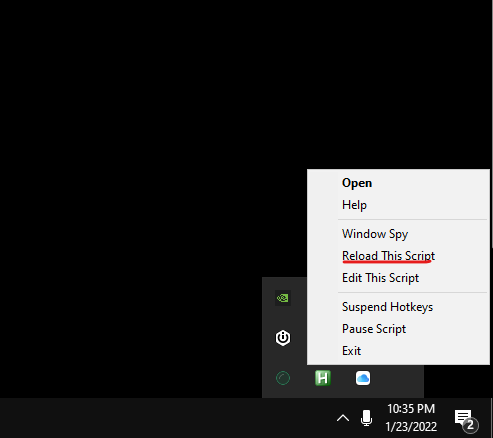
Any saved changes to a running script will need to be done by locating it in the Windows taskbar and right clicking to reload it.
The Real Deal
Let's start off with the simple re-mapping case: copy & paste.
#c::Send ^c
#v::Send ^v
This syntax enables simple "one-liner" re-mappings. # is the Windows key here and ^ is Crtl. Save those two lines and reload to test your new copy paste with the Win key. To add additional text manipulation with cut, select all, undo, and save:
#x::Send ^x
#a::Send ^a
#s::Send ^s

#z::Send ^z
#+z::Send ^+z
Notice the addition of + in the binding to represent adding Shift to the hotkey combination.
The CMD Tab Experience
Let's do something a lot more complex, but absolutely necessary for working as expected: Alt-Tab translated to Win-Tab (Command Tab).
~LWin::Send {Blind}{vkE8}

#Tab::
  Send, {Alt Down}{Tab}
  SetTimer SendKeysUp, -100
return

#+Tab::
  Send, {Alt Down}{Shift Down}{Tab}
  SetTimer SendKeysUp, -100
return

SendKeysUp:
  KeyWait, LWin
  KeyWait, Shift
  Send, {Alt Up}{Shift Up}
return
Adding the lines above and reloading your script should make the Win + Tab feel exactly Mac, allowing simple switching between open applications. Here's a quick explanation:
- The first line disables the single
Winwhen it's not used as a modifier. This has the added benefit of preventing unintentional interruptions during gaming! Read more on this page, half way down. - The
#Tabis theWinandTabkey combination. We map this to{Alt Down}{Tab}, which is a special syntax for raw inputs designed to open the Alt + Tab flow. - The
SendKeysUpmacro is invoked to confirm the selection of the window.
Finally, I've re-mapped some very simple and commonly used hotkeys, like new tab, new window, and Find and Refresh. The ones I use are just my favourites and are in no way comprehensive. While there's definitely a more elegant and functional solution for this, for now I'm intentionally adding these manually as I notice they are missing. My goal is to keep updating the script as a form of living documentation of what I use the most. Feel free to customize this starting point or go nuts and send an email if you like it!
The full CommandKey_0.0.1.ahk script:
~LWin::Send {Blind}{vkE8}

#Tab::
  Send, {Alt Down}{Tab}
  SetTimer SendKeysUp, -100
return

#+Tab::
  Send, {Alt Down}{Shift Down}{Tab}
  SetTimer SendKeysUp, -100
return

SendKeysUp:
  KeyWait, LWin
  KeyWait, Shift
  Send, {Alt Up}{Shift Up}
return

#c::Send ^c
#v::Send ^v
#x::Send ^x
#a::Send ^a
#s::Send ^s
#d::Send ^d

#n::Send ^n

#z::Send ^z
#+z::Send ^+z

#f::Send ^f
#+f::Send ^+f

#t::Send ^t
#+t::Send ^+t

#r::Send ^r
#+r::Send ^+r

#w::Send ^w
#+w::Send ^+w
On Startup
The last thing we'll cover is how to run the script on startup. This is an essential step to make transitioning between macOS and Windows as seamless as possible. The documentation in the FAQ is clear on how to do this, so I'll reproduce the steps here:
- Find the script file, select it, and press
Ctrl + Cto copy. - Press
Win + Rto open the Run dialog, then entershell:startupand click OK orEnter. This will open the Startup folder for the current user. To instead open the folder for all users, entershell:common startup(however, in that case you must be an administrator to proceed). - Right click inside the window, and click "Paste Shortcut". The shortcut to the script should now be in the Startup folder.
Notes, Changelog
Overall, I found setting this up to be relatively painless and kind of fun to use. Happy with the solution so far and I wish I'd found it sooner. For improving other Windows development tasks, check out my guide on Modern Windows Workflow with WSL2, Alpine Linux, and Oh My Zsh.
Note: Be wary of Win + L and related combinations as it'll lock your Windows session. I know there's a way to change this or avoid it, but I haven't gotten to it yet.
What's missing:
- Command + Click for opening a link in a new tab doesn't work with
Win, yet. Use middle mouse click orCrtl. - Personal Hotkey: Drop down Windows terminal
- Small things in VSCode like zooming in with
- Functions the simple bindings are missing (Remember: I'm intentionally hardcoding keys to better understand the hotkey combinations I'm accustomed to or use most often as a form of documentation).